Friday, November 12, 2010

Autumn Cupcakes


Very interesting story behind this company so if you're interested, you should Google it. For now, it's important that you know not all cake mixes are created equally. This box will run you around $4 which is a lot considering that you can usually get a Duncan Hines or Betty Crocker mix on sale for $1 on any given day. The problem with those mixes is they reek and taste of chemicals. That isn't appetizing. Dr. Oetker has no chemical scent and the finished product was lovely to behold and delicious to taste. No chemical taste. The cake was sturdy yet properly moist. It puffed right up as you can see here. (My cupcake carrier got left at a friend's house)


Right after these left the oven, they were injected with a Fleur de Sel caramel sauce from Trader Joe's.


 I used a sauce/condiment bottle to do the damage. 


If you use a thicker caramel sauce then warm the sauce up first. The sauce I used had a perfect consistency to where it didn't need heated up. When the cupcakes were done baking, I put them on a cooling rack and just pushed the tip of the bottle into the middle of the cupcake and injected a few squeezes' worth. You can cover up the hole with frosting once the cupcakes are cooled.

For frosting I made a simple browned butter frosting. As you can find on the Land O Lakes website:

BROWNED BUTTER FROSTING

6 tablespoons unsalted butter
3 cups powdered sugar
1 and 1/2 teaspoons vanilla
3-4 tablespoons milk

Melt 6 tablespoons butter in 1-quart saucepan over medium heat. Continue cooking, stirring constantly and watching closely, until butter just starts to turn golden (4 to 6 minutes). (Butter will get foamy and bubble.) Remove from heat. Cool completely.

Combine browned butter, powdered sugar and 1 1/2 teaspoons vanilla in small bowl. Beat at medium speed, gradually adding enough milk for desired spreading consistency. Frost cooled cake


And for the all important cupcake topper I made some little acorns I saw online, using Hershey kisses, mini Nilla wafers and mini chocolate chips. I stuck them all together with melted chocolate chips


These were for my friend Lyndsay's, birthday and I feel that fall birthdays deserve fall themed cupcakes.


And voila! Just don't let the squirrels get to them first!

Tuesday, October 5, 2010

Scotcheroos


Let's talk about something important. Put... that Scotcheroo... down! Scotcheroos are for closers only. You think I'm- Okay I'll stop there.

Recently it came to my attention that some people have never even heard of Scotcheroos. Maybe these bar cookies are native to the midwest. I'm not sure, but I do know one thing.... ABC. A - Always, B- Be, C - Cooking. Always Be Cooking. ALWAYS BE COOKING.

And don't skimp on the good ingredients. Get name brand peanut butter. Like Peter Pan. It's almost always on sale. And get REAL Rice Krispies. Don't get cheap ones. You can definitely tell the difference even if you don't have a palette refined to detect such things as variations in your breakfast cereal.
I believe I can fly.


Here's the recipe as found on the Kellog's website.

Chocolate Scotcheroos

1 cup light corn syrup
1 cup granulated sugar
1 cup peanut butter
6 cups Kellog's Rice Krispies cereal
1 package semi-sweet chocolate chips  milk chocolate chips
1 cup butterscotch chips 
(Honestly... I use 1 bag of chocolate chips and 1 bag of butterscotch chips and just go to town.)

Directions:
1) Place corn syrup and sugar into 3 qt. saucepan. Cook over medium heat, stirring frequently, until sugar dissolves and mixture begins to boil. Remove from heat. Stir in peanut butter. Mix well. Add Rice Krispies cereal. Stir until well coated. Press mixture into 13x9x2 inch pan coated with cooking spray. Set aside.


2) Melt chocolate and butterscotch chips together in a glass bowl in the microwave in 30 second increments, stirring between each increment. Don't overdo it though, you crazy mother! Spread evenly over cereal mixture. Let stand (or chill) until firm. Cut into squares when cool. 


Oh man, can you even deal?!


Go and do likewise. 

Friday, September 3, 2010

Pudding Cups


Why does it seem like the best pudding cups at the grocery store are always sugar free?! Well, these pudding cups definitely are NOT sugar free. 

I started off with a very simple chocolate pudding for the bottom layer. I found the recipe on Allrecipes.com


One is the loneliest number. 


Ingredients
1/2 cup white sugar
3 tablespoons unsweetened cocoa powder
1/4 cup cornstarch
1/8 teaspoon salt
2 3/4 cups milk
2 tablespoons margarine or butter
1 teaspoon vanilla extract


Directions
In a saucepan, stir together sugar, cocoa, cornstarch and salt. Place over medium heat, and stir in milk. Bring to a boil, and cook, stirring constantly, until mixture thickens enough to coat the back of a metal spoon. Remove from heat, and stir in margarine and vanilla. Let cool briefly, and serve warm, or chill in refrigerator until serving.


I got the vanilla bean pudding recipe from The New York Times site.


The vanilla bean specks look superimposed. 

Ingredients
2 1/2 cups half-and-half or whole milk
2/3 cup sugar
Pinch of salt
1 vanilla bean or 1 teaspoon vanilla extract
3 tablespoons cornstarch
2 tablespoons unsalted butter, softened (optional).


Directions 1. Put 2 cups of half-and-half or milk, sugar and salt in a small or medium saucepot over medium-low heat. If using a vanilla bean, split in half lengthwise and scrape seeds into milk or half-and-half using small sharp knife, then add pod. Cook just until mixture begins to steam.
2. Combine cornstarch and remaining milk or half-and-half in a bowl and blend; there should be no lumps. Fish pod from pot and discard. Add cornstarch mixture; cook, stirring occasionally, until mixture starts to thicken and barely reaches a boil, about 5 minutes. Immediately reduce heat to very low and stir for 5 minutes or so until thick. Stir in butter and vanilla extract, if using.
3. Pour mixture into a 1-quart dish or 4 to 6 small ramekins or bowls. Put plastic wrap directly on the pudding to prevent formation of a skin, or do not cover if you like skin. Refrigerate until chilled, and serve within a day, with whipped cream if you like. Whisk to remove lumps if needed.
Yield: 4 servings.
Note: To make chocolate pudding, shave or finely chop 2 ounces bittersweet chocolate. Stir into pudding with the butter.


Baking or cooking with vanilla beans requires some planning ahead so you don't get ripped off. You may spend anywhere from $12 to $17 buying two vanilla bean pods. I get my vanilla beans from a trusted eBay seller, Vanilla Products USA. If you go to their store you can order 10 Grade A 6 incher Madagascar Bourbon vanilla beans for under $10 including shipping and handling. Whoa, Nelly!  Although I love chocolate more than almost anything, I do prefer vanilla ice cream and pudding. I don't know why. I guess 'cause they're sweeter. So, suffice it to say, my favorite layer in the pudding cups was the top layer! However, eating chocolate pudding while it's still warm is definitely a note-worthy treat. 


Pudding cups waiting to fulfill their destiny. 


Tuesday, August 17, 2010

Mushroom and Blue Cheese Quiche


If you can make cupcakes, a quiche will be a piece of pie. NOT!!! I totally messed this recipe up once. I was bitterly disappointed. It was underdone and inedible. I cried because I was so upset that I wouldn't get to consume the delicious smelling thing I'd been baking for the past 35 minutes. But I didn't give up. A few nights later I tried again successfully. I looked up baking times and adjusted the recipe I'd found at Cooking.com

RECIPE INGREDIENTS
For Crust:
1 recipe Basic Pastry Crust Dough I, shaped into 3/4-inch-thick round, chilled
Buy a Marie Callender's frozen pie crust

For Filling:
2 tablespoons (1/4 stick) unsalted butter
1 cup chopped onion
8 ounces crimini, oyster, shiitake or other mushroom caps (see headnote), thinly sliced
1 tablespoon balsamic vinegar
1 garlic clove, minced

1 1/4 cups crumbled blue cheese
3 large eggs
2 tablespoons chopped fresh parsley
1/4 teaspoon (scant) salt
Pinch of ground black pepper


DIRECTIONS
FOR CRUST: Position rack in center of oven and preheat to 400 degrees F. Roll out dough on wax paper to 12-inch-diameter round. Invert dough into 9-inch-diameter tart pan with removable bottom. Trim dough overhang to 1 inch. Fold overhang in and press, forming double-thick high-standing sides. Pierce crust all over with fork. Freeze 30 minutes. Line crust with foil; fill with pie weights. Place tart pan on baking sheet and bake crust until sides begin to set, about 20 minutes. Remove foil and pie weights. Bake crust until cooked through and pale golden, piercing with fork if crust bubbles, about 10 minutes longer. Cool crust in pan on cooling rack. Reduce oven temperature to 375 degrees F.
Bake pie crust at 375 degrees for 15-20 minutes.


FOR FILLING: Melt butter in medium skillet over medium heat. Add onion and saute until tender, about 5 minutes. Stir in mushrooms. Cover and cook until juices form, stirring occasionally, about 5 minutes. Stir in vinegar and garlic. Simmer uncovered just until juices evaporate, about 5 minutes. Cool mushroom mixture completely.
Sautéing.

Place crust in tart pan on heavy large baking sheet. Spoon mushroom mixture evenly over bottom of crust. Sprinkle half of blue cheese over.


I used Laughing Cow blue cheese for reduced fat (and cost). 

 Whisk cream, eggs, parsley, salt and black pepper in medium bowl to blend. 

Whisking. 
Slowly pour custard over fillings. Sprinkle with remaining cheese. Bake quiche on baking sheet until puffed and golden brown, 20 minutes at 425 degrees and then 25 minutes at 375 degrees.

Transfer quiche to platter. Cut into wedges and serve warm.

Holla!

Monday, August 16, 2010

Cupcakes a la mode


Frosting that looks like ice cream! I saw this idea online from a bakery in Australia called Sugadeaux. I don't remember how I came across the image. The bakery puts something in their frosting called Chocolate Crackle. I opted for Heath toffee and almond bits in my frosting.


I used an entire bag of the Heath bits in a batch of standard vanilla frosting on top of the very easy, very delicious One Bowl Chocolate Cake cupcakes (same kind I used for the strawberry chocolate cupcakes in an earlier post). I chilled the icing to get it to set so it would be easy to scoop out with a little cookie scoop. The ratio of frosting to cupcake is perfect! 

Monday, August 9, 2010

Chocolate Truffle No Bake Pie

Look at that caramel seeping out.

Recipe courtesy of Women's Day. Gina saw the no bake dessert recipes at that link and thought we should try one. I'm hoping to try them all because they all look ridiculously delicious and easy.


Recipe Ingredients

    • 1⁄2 cup pecan pieces, toasted and coarsely chopped
    • One 6-oz ready-to-fill chocolate-flavored crumb crust
    • Caramel Layer
    • 3⁄4 cup (5 oz) individually wrapped caramels (17 squares), unwrapped
    • 1⁄4 cup canned evaporated milk (not sweetened condensed)
    • Truffe Layer
    • 1-1⁄2 cups (9 oz) semisweet chocolate chips
    • 1 cup heavy (whipping) cream
    • 3 Tbsp stick butter

Recipe Preparation

    1. Sprinkle pecans on crust.2. Caramel Layer: Heat caramels and evaporated milk in a heavy saucepan over low heat or in a bowl in microwave, stirring often until caramels melt and mixture is smooth. Pour over pecans.3. Truffle Layer: Heat chocolate chips, cream and butter in a heavy saucepan over low heat or in a bowl in microwave, stirring until chocolate melts and mixture is smooth. Pour over Caramel Layer and refrigerate about 4 hours until set.4. To serve: Pipe or spoon on whipped cream.Garnish with sweetened whipped cream.


I did buy a shortbread pie crust to put the pie in. It was good but too thin. I like a thicker, crunchier crust so next time I'd make my own even though that's more work and I'm really lazy.


I toasted the pecans in the oven for 7 minutes at 350. That was plenty of time in my oven.


I used Trader Joe's fleur de sel caramels. No, my local TJ's doesn't carry those year 'round. Yes, I did save ONE lone box of them from Christmas. (They were good through October.)

The chocolate truffle layer was soooo rich, even for me and my sweet tooth.


Have to let it chill for 4 hours before eating.

Chocolate puddle!


Next time I make this, I'd halve the truffle layer and increase the caramel layer by 50%. And maybe throw in a few more toasted pecans. Yessssss!


I still have so many recipes and photos to post and I need to hurry and get them posted because my Animal Crossing: City Folk game should be in the mailbox any day now and I won't have any spare time then!

Thursday, August 5, 2010

Broccoli Cheddar Cornbread

Okay so we have a guest baker this time and it's my boyfriend, Bryan!


Not only is he the lead singer and guitarist for one of the most amazing LA based bands, Just Off Turner (www.justoffturner.com) but he's also a hell of a cook. He adapted this recipe from that Down Home With the Neelys show on Food Network. His mom also makes a similar dish and you know when it's a mom recipe, it's gonna be good! It was a huge hit with everyone at a brunch we went to! NOTE- this recipe calls for a cast iron skillet but if you don't have one (and why DON'T you? They're amazing!) then you can always use an 11 by 17 inch baking dish.


Broccoli Cheddar Cornbread
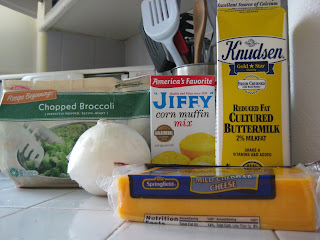
  • 2 boxes corn muffin mix (like Jiffy)
  • 2 eggs
  • 2/3 cup of buttermilk or regular milk
  • 14 ounce bag of frozen chopped broccoli, thawed
  • 1 white onion, chopped
  • 1/2 stick butter
  • 8 ounce container cottage cheese
  • 1.5-2 cups shredded cheddar cheese

-Preheat the oven to 375. Now you're going to melt the butter in a cast iron skillet. Saute the onions and broccoli until soft.


While you've got that going, prepare the cornbread mix according to the directions. This is where the milk and eggs come in. Bryan used buttermilk instead of regular milk and it came out delicious but you can use whichever you like really. Also, if you have a favorite cornbread mix, feel free to use that. The first time he made it he used the Trader Joe's brand but we both liked the Jiffy better.

I mean it DOES say America's Favorite.
Next, add the cottage cheese to the cornbread mixture. This is going to make it really moist and yummy! Now add in the cheddar cheese. Feel free to add a little more or less cheddar depending on how cheesy you want it. 

I like mine as cheesy as a Nic Cage movie!
Now pour the cheesy deliciousness that is the whole cornbread mixture into the cast iron skillet with the broccoli and onion and mix everything around. Sprinkle more cheddar cheese on top. Now put it all in the oven.

Now bake in the oven for 25-30 minutes or until it's a golden brown color on top. Get ready for a collage of yummy!


Yay! Thanks to Bryan for the recipe. Repay him by checking out some of his amazing music! Link again: www.justoffturner.com

If you want to be a guest baker, just send us a message on our facebook page or post a comment! http://www.facebook.com/pages/BaketyBakeBake/134901399874475?ref=ts

Friday, July 30, 2010

Reynolds Product Review and Giveaway


Cupcake wrappers needed to be fixed for a long time now.  White, foil and pastel colors tend to get boring fast. It was possible to buy wrappers with decorations in some grocery stores or at a craft store but so often the design wouldn't be visible after the cupcakes were baked. These new Reynolds baking cups eliminate that problem. As demonstrated here:


They're foil lined. See? 


And come in a great variety of colors and designs. 


We are giving away 4 packs of these cupcake wrappers in various designs and to win you simply need to follow our blog (to become a follower, sign up and click on the follow tab at the top left-hand side of the page) and leave a comment stating which cupcakes you'd bake first with these beauties. If you win, we'll contact you for your mailing address. Btw, only one comment per person!

The contest will close on Friday, August 6th and the winner will be chosen using Random.org. Good luck!

Tuesday, July 20, 2010

Baked Brie

Okay so I love me some cheese. Who doesn't right? (Sorry lactose intolerants) So any time I can incorporate cheese into a recipe is a good day. Brie is definitely one of my favorites. It's just so delicious and creamy. This recipe is great to bring to brunches or put out as an appetizer. Serve it up with your favorite crackers or apple slices or do like we did and just eat it as is!

This recipe is adapted from a bunch of different baked brie recipes out there online.

BAKED BRIE
  • 1 tube Pillsbury crescent rolls
  • 1 round wheel of brie
  • Strawberry jam, or other flavor you like (it should be jam even though jam gets a bad rap due to the saying "It must be jelly 'cause jam don't shake like that." Trust me, jam works better here.)
  • Handful of chopped walnuts
  • Maple syrup
  • Brown sugar
Preheat the oven to 350. Now roll out the crescent roll dough on a non stick cookie sheet (or simply use cooking spray if you don't have the nonstick kind). Place the wheel of brie in the center of the dough.


Next, grab your jam of choice. I like Strawberry Smuckers because with a name like Smuckers, it has to be good. 


Remember that commercial? No? Okay thanks for making me feel old. Now I'm sad and the only way to cheer me up is with more jam. It should be seedless but as for the flavor, you can use whatever you like. I might use apricot for the next one!
Okay so spread the jam all over the top and sides of the brie and the top it with a handful of chopped walnuts.


Okay now there are a few ways to do this next part. The easiest way is to simply fold the dough up and over the brie. That's the way I did it. Now if you want it to look nicer, you can fold the dough up and then cut off the extra dough at the top and pinch it together. The fanciest way to do it is, instead of just pinching the dough, secure it with some twine. Like, I said, I did it the first way but all work equally as well. Make sure the dough will stay in place though. You don't want the cheese bursting out mid bake and trying to make a run for the border.

Next take a basting brush (or just a spoon-I won't tell) and brush the maple syrup all over the dough. 


And then sprinkle the brown sugar on top of the whole thing. Amity just recently explained to me the difference between light and dark brown sugar and explained that unless a recipe specifically calls for dark, always go for light. Those instructions also fly if you're, say, deciding what kind of Jedi to be. 


Okay so now bake it for about 20-25 minutes or until the dough gets a golden brown color. You kitchen should be filled with the smell of maple syrup by now!


Okay now let it sit for 10 minutes before serving or else the cheese may be too gooey and come rushing out of the dough to freedom.


And bam! Just like that, cheesy, sweet, savory deliciousness! For an added dose of fancy, use cookie cutters to cut shapes out of the extra dough and put those on top before baking. I tried to do a star but little leaves might look nice!